Monday, December 14, 2020

How GD&T reduces per piece cost of the component in manufacturing Industry?

     Geometric Dimensioning and Tolerancing (GD&T) is a common symbolic language followed in Engineering industry on Part Drawing. There are many tangible advantages of GD&T over coordinate system dimensioning & tolerancing. We will see following major three advantages contributing to savings.

1. 57% OK parts are recovered which are being rejected based on coordinate system dimensioning and tolerancing? resulting increase in acceptance level and subsequently reduces Cost per piece.
 

Figure 1
          Above figure depicts square tolerance zone 0.2 X 0.2 for position of hole dia. 15.3/15.4 as per coordinate measurement system. Actual positions of holes on all manufactured parts should lie between square tolerance zone 0.2X0.2. Any hole found outside this tolerance zone will get rejected. In above figure all yellow & green centers of the holes are within this acceptable tolerance zone. If you observe carefully, all centers of holes positioned at apex of square are farthest from nominal center of hole ie. at a distance of 'a'. But all red centers are out of acceptable square tolerance zone and are rejected as per current coordinate system in spite of they are at distance 'a'. Practically all holes having red centers are functionally OK and are similar to holes having green centers observed at apex of the square.
          This contradiction is addressed by GD&T by accepting all holes located out of square tolerance zone but lying within circle of diameter equal to diagonal of square ie 2a. In short GD&T has widened the area of acceptance by 57% which can be geometrically calculated by subtracting area of square from area of circle. Rather we can say now GD&T has accepted 57% functionally OK parts which we were rejecting it as on date as per co-ordinate measurement system. This circle is nothing but round tolerance zone of positional tolerance. This round tolerance zone is addressed as positional tolerance in GD&T, depicted in below figure. 


                                                              Figure 2

2.GD&T provides more additional tolerance as a bonus for assemblies having loose fitment or having clearance fit. This improves acceptance level of parts in manufacturing.

           Another way of increasing acceptance level or reducing PPM defect by exercising bonus tolerance awarded by GD&T. Particularly for clearance fit or loose fitment application designer can apply MMC condition if it is not affecting performance of the final assembled product. It is designers call to apply modifiers for MMC/LMC/RFS based on application, performance & expectation at customer end. If MMC or LMC condition is applicable then manufacturer will get addition tolerance depending on feature of size (FOS). For RFS condition bonus tolerance is not applicable.
                 Example in fig 2 is the case of MMC modifier applied for positional tolerance of hole dia 15.3/15.4. Following table shows bonus tolerance against size of the hole.        


            Bonus tolerance is zero at MMC condition and it is maximum at LMC condition. It is 0 at dia. 15.30 (MMC of hole) and 0.38 at dia. 15.40. Bonus tolerance is applicable in GD&T, for coordinate system tolerance is always fixed like RFS in GD&T. Here as per coordinate system tolerance remains 0.20 for any size of hole dia. Ultimately acceptance level of parts is increased in GD&T by exercising Bonus tolerance facility. This would further increase acceptance level and subsequently reduces Cost per piece.

3.Reduction in inspection cost of the part, which is one of the major contributing factor of manufacturing cost.

           Once part is designed for MMC condition, designing qualifying gage becomes easy. All qualifying gages are GO type and checks functionality of part. If part rest against datums on gage and easily gets assembled on gage without fouling then part is OK. If part fouls for resting & location then it is rejected. Any unskilled operator can check with training and SOP(Standard Operating Procedure). Qualifying gage checks that part is not crossing worst case boundary defined by MMC & tolerance given in control frame. Subject concept is not applicable in co-ordinate system as tolerance is not depend on feature of size. We need to always check parts by lay out method or CMM. Hourly operating rate of CMM is always very high. Secondly we can not afford 100% inspection by layout or CMM method. Below figure depicts simple qualifying gage for qualifying positional tolerance dia.0.28 for hole dia. 15.3/15.4 at MMC w.r.t. datums A,B and C.


         Apart from above three major reasons of reduction in manufacturing cost, GD&T has many other intangible benefits like more clarity and neatness in part drawing, minimum notes in text, common understanding among Design, Production & Quality functions resulting better alignment without any conflict in understanding. Hence, all engineers must learn to apply, read and interpret GD&T effectively as it is a language of 21st century...
     

Sunday, December 13, 2020

Organisation Structure


         Above organisation chart is showing typical organisation structure of any automotive manufacturing OEM/ Supplier. Every element in the chart will have unique function, however depending on the organisation strategy, scope, manpower availability, responsibility is assigned to employees. Sometimes in small organisations many functions are clubbed together and assigned to the single employee or in large organisations functions are broken in sub functions and assigned to the more number of employees. No matter all functions are important for any manufacturing organisation irrespective of whether employee is part of organisation ie. on employer role or outsourced to external agency like recruitment of manpower, Maintenance, Administration is outsourced etc.

Brief function of all functions in the organisation structure.

Business Head : He is highest authority in the organisation. All functional heads report to Business Head.

Research & Development:

Product Planning (1) :

To plan new product as per the current and future needs of the Customer. Product concept finalisation. To plan long term product strategy 

Design (2) :

To finalise design goals & specifications along with product planning. Convert design goals in part drawings and specification sheets.

Testing & Reliability (3) :

To make prototypes and test it in simulated customer environment and give feedback to design for making corrections. To measure & anticipate reliability & warranty life of product based on testing results.

Manufacturing Engineering (4) :

To plan Facility, Tooling & gages for new products, establish it and handover to production.

Administration (5) :

To monitor day to day requirement of employees in office & plant such as cleanliness, staff requirement, event management, security management etc.

Manufacturing (Production) :

Production Planning & Control (6) :

To plan daily, weekly and monthly schedule for production. ie models, colour combinations, Quantity and sequence of production based on requirement received from sales.

Maintenance (7) :

To maintain all equipment, fixtures, machines, tools, facility in plant in working condition as and when required by production.

 Power Planning & Supply (8) :

To do centralised power planning of electricity, fuel gas, compressed air supply and disposal of waste as per sustainibility guidelines.

Tool Room (9) :

To maintain dies and fixtures. Make spare parts of machines, equipment as per need from maintenance department. Carry out tool regrinding activity till life of tool is over particularly for HSS tools such as drills, hobs, shaving cutters, brazed tools etc. To make new tooling, fixtures as per need.

Marketing (10) :

Identify new customer base, Channel development, Dealer readiness for new products, Dealer Training, support product planning for market survey.

Sales (11) :

Enquiry generation and conversion for sale. Dealer wise yearly planning for sale.

 After Sale Service (Customer Care) (12) :

To provide service to customer for repair and maintain the product performance. Warranty settlement of parts replaced within warranty by dealership. Organise technical training to dealership personnel.
Quality :

Manufacturing Quality (13) :

To ensure product quality during manufacturing as per the specification on part drawing.

Supplier Quality (14) :

To ensure product quality of parts supplied by vendor or supplier.

Field Quality (15) :

To get feed back of field failures of parts at customer end from Customer Care and to take action on design, at manufacturing and at supplier end so that defect free product will be supplied to the customer in future.

Quality Planning (16) :

To ensure quality before launch of new product during Design, Manufacturing and at supplier end by ensuring all requirements of QMS are adhered such as Design Review, DFMEA, PFMEA, DVPR, Proto Testing etc.

Human Resources (17) :

Human resource planning & recruitment as per need. Training and development of employees. Ensure Personal & Industrial relations among employees.

Supply Chain Management (18) :

Ensuring supply of right quantity of parts of right models from suppliers by procuring it  as per schedule released by Production Planning & Control. 

Part Development (19) :

Part development at supplier as per time line of new projects.

Accounts & Finance (20) :

Financial planning, reporting and controls, investments, cash management , risk management, auditing and accounting.

 Program Management (21) :

To ensure projects are meeting Quality, Cost & Time targets.

NOTE:  

All above functions are documented briefly in generic way, however it would differ organisation to organaisation. More specific details are available in respective organisation's QMS Apex manual.

courtesy: https://ungliiart.com/TrainingDetails.php

Thursday, December 10, 2020

Abbreviations of QMS (Quality Management System)

 Abbreviations 

  • APQP     :  Advance Production Quality Planning
  • CAPA      : Corrective and Preventive Action
  • CIR         : Customer Input Requirements
  • Cp, Cpk  : Process Capability Indices
  • CFT        : Cross Functional Team
  • CPQ       : Customer Perceived Quality
  • CKD        : Completely Knocked Down
  • CAD        : Computer Aided Design
  • CAE        : Computer Aided Engineering
  • CSI          : Customer Satisfaction Index
  • DWM       : Daily Work Management
  • DR           : Department Representative
  • DR           : Design Review
  • EWT        : Effective Work Time
  • FMEA      : Failure Mode & Effect Analysis
  • FEA         : Finite Element Analysis
  • FTG         : Facilities Tooling & Gages
  • DVP        : Design Verification Plan
  • DVPR     : Design Verification Plan & Report
  • ICA         : Interim Containment Action
  • IQA         : Internal Quality Audit
  • IQS         : Initial Quality Study
  • ISO         : International Organisation for Standardisation
  • KPI         : Key Performance Indicator
  • KRA        : Key Result Area
  • MOP       : Measure of Performance
  • MIS        : Month In Service
  • MR         : Management Representative
  • MSA       : Measurement System Analysis
  • MRM      : Management Review Meeting
  • MTBF    : Mean Time Between Failure
  • MTTR    : Mean Time To Repair
  • NVH      : Noise , Vibrations and Harshness
  • PPM      : Parts Per Million
  • PSW     : Part Submission Warrant
  • PFC      : Process Flow Chart
  • PFD      : Process Flow Diagram
  • PFMEA : Process Failure Mode & Effect Analysis
  • PDCA    : Plan Do Check Act
  • PDSA    : Plan Do Study Act
  • PCA      : Permanent Corrective Action
  • PPAP    : Production Part Approval Process
  • SPC      : Statistical Process Control
  • QFD     : Quality Function Deployment
  • QMS    : Quality Management System


Monday, December 7, 2020

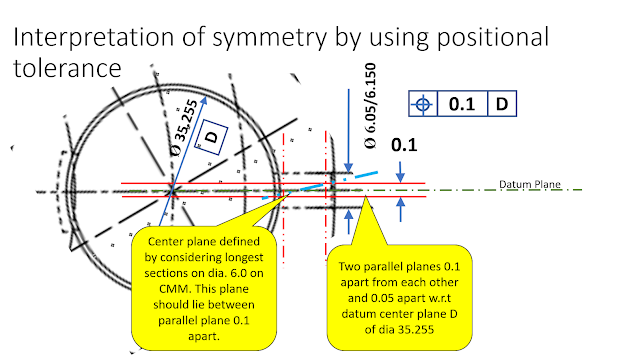
How to inspect symmetry between two cross holes?

 Part Drawing Requirement :


Let us see the interpretation, if we replace Symmetry symbol by Positional Tolerance : 


Inspection of above control frame to be done as per note 3 of Inspection Illustration. In this case also gage design will be difficult or it would be too costly as positional tolerance is RFS


Saturday, December 5, 2020

Composite Control Frame for Profile of Surface


Illustration: Profile of Surface control is applied generally for non regular shapes of castings, forgings or Pressed components. Here upper segment is depicting specification for compete pattern shifting of contour i.e. 0.5 mm Whole pattern can move in a band of 0.5 mm in any direction w.r.t datum A

Lower segment is controlling surface error within band of 0.1 mm. All high points and low points on the surface should lie between band of 0.1 mm. Both these phenomenon are illustrated in following figures.

Upper segment is also known as Pattern Locating Tolerance Zone (PLTZ) and Lower segment is known as Feature Relating Tolerance Zone (FRTZ)


PLTZ will have impact on wall thickness of subject casting, forging due to shift in above case and FRTZ will have impact on overall thickness and wall thickness due to high & low points on curvature (feature) which is within band of 0.1 mm


Friday, December 4, 2020

How to check flatness for composite control frame?


Illustration :  Upper segment of control frame is depicting total flatness specification ( 1mm) for overall complete area of part. Lower segment of control frame depicting flatness specification (0.3 mm) for any small part on the surface 35mmX 35mm on overall area. Modifier F represents free condition of part while inspection. i.e. Part to be kept on surface plate without any clamping load on it.

Inspection Procedure : 


- Nandkumar Walve, Corporate Trainer on Quality
  (nnwalve@gmail.com, 9820424387, https://ungliiart.com/TrainingDetails.php)


Process Failure Mode & Effect Analysis

       PFMEA         Hi, friends, Process FMEA manual has been revised and AIAG & VDA jointly released new edition of the manual. Now o...